Various other features:
HomeFree offers several other features besides simple file management, uploading and directories. Currently, suers have the ability to change their user information, and to make/edit their own web based message board.
Changing your user information
One of the great features of HomeFree is that every user has the ability to change their password, name, email address and site name/description. To change any user information login to the file manager program and go to the very bottom of the page where you will see a drop down list. Select "Change user info" from this list and click the "Submit Query" button.


Changing your password
Once you are on the change suer information page, you have the ability to change your password by simply typing the new password into the password field and clicking the "Update Account Info" button. This will change your password for the file manager so write down the password as administrators may not be able to get ti back for you if you loose it!
Changing your Site Name/Description
Every site created with HomeFree can be viewed by going to http://www.site.com/cgi-bin/new.cgi?view=all. The sites are by default simply listed with the creator's name and a line stating that they have no data yet. If you want to change this line, you can do so under the user information page. To change your site information, simply fill in the Site Name and Site Description field and click the "Submit Query" button.
Setting up a web board
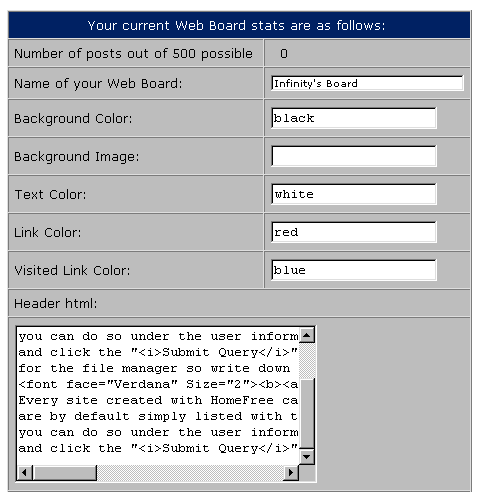
If your account allows a webboard, you will need to activate it by logging into your file manager, scrolling to the end of the page and selecting "Web Board" from the drop down list and click the "Submit Query" button. You will then be taken to a page where you can either activate or edit your web board. You will have several options for your webboard:
- Number of posts out of 500 possible: this tells you how many messages you have. When you are close to the maximum number of files allowed, you should use the pruning option.
- Name of your Web Board: this will be the name used on the webboard pages and as your web board's title.
- Background Color: this will be used as the background for all your webboard pages.
- Background Image: this will be used as the background image for all your webboard pages.
- Text Color: this will be used as the standard text color on all webboard pages.
- Link Color: this will be used as the standard link color on all web board pages.
- Visited Link Color: this will be used as the standard visited link color on all web board pages.
- Header html: this allows you to add any desired html to the top of all web board related web pages.
- Footer html: this allows you to add any desired html to the bottom of all web board related web pages.

- Pruning Messages: this allows you to delete old/bad threads to save on disk space, total threads and to remove improper posts.
- Thread Order - allows you to remove threads by their normal listing order.
- Posted Order - allows you to remove threads by their posting date.
- Date - allows you to remove threads by their creation date.
- Author - allows you to remove threads by their author.

Setting up a guest book
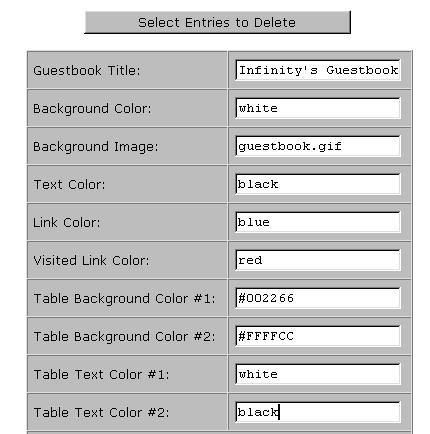
If your account allows a guest book, you will need to activate it by logging into your file manager, scrolling to the end of the page and selecting "guest book" from the drop down list and click the "Submit Query" button. You will then be taken to a page where you can either activate or edit your web board. You will have several options for your guest book:
- Select Entrees to delete - this allows you to delete any old threads for content or to save on disk space.
- Name of your guest book: this will be the name used on the guest book pages and as your web board's title.
- Background Color: this will be used as the background for all your guest book pages.
- Background Image: this will be used as the background image for all your guest book pages.
- Text Color: this will be used as the standard text color on all guest book pages.
- Link Color: this will be used as the standard link color on all guest book pages.
- Table Background Color #1: this will be used as the background color for your guest book table header.
- Table Background Color #2: this will be used as the background color for your guest book general table.
- Table Text Color #1: this will be used as the text color for your guest book table header.
- Table Text Color #2: this will be used as the text color for your guest book general table.
- Visited Link Color: this will be used as the standard visited link color on all guest book pages.
- Header html: this allows you to add any desired html to the top of all guest book related web pages.
- Footer html: this allows you to add any desired html to the bottom of all guest book related web pages.

If the categories feature has been enabled on your host's site then you will be able to move your account from one category to another. To do so, log into your file manager, scroll to the end of the page and select "Move Account" from the drop down list and click the "Submit Query" button. You will then be taken to a page with a brief description of each category along with the number of open spaces and the url for your new site. Select the category to move to from the drop down list at the end of the page, click the button and your entire account and all your files will be moved!

FAQ and Tutorial © Ted Sindzinski, 1998 - 1999.